How to frame your photos correctly?
In this article :
Whether you are a company looking to improve its visual communication or an enthusiast passionate about beautiful images, mastering good framing is essential for photos that captivate. Have you ever struggled to structure your shots? Don’t worry, we’re here to answer this question: how do you frame your photos well?
1. Master the Rule of Thirds
One of the basic principles in photography is the rule of thirds. Imagine dividing your image into nine equal parts using two horizontal lines and two vertical lines. The goal is to place the most important elements along these lines or at their intersections. This helps create a natural balance and avoids an overly rigid centering of your subject.
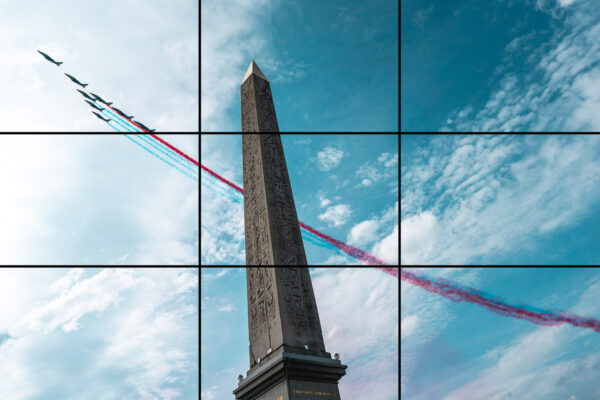
For example:
- Place the horizon line on the upper or lower third, rather than in the center.
- Position your subject on one of the vertical lines to add interest to the composition.
- If your subject is in motion, leave space in front of them to energize the scene.
2. Experiment with Angles and Perspectives
In photography, playing with perspectives can transform a classic photo into something much more creative. Varying the shooting angles allows you to change the perception of the subject and make the image more captivating. Don’t limit yourself to shooting at eye level. Try high-angle shots to capture scenes from above, or low-angle shots to give your subject a sense of power.
 High-angle shot that allows capturing the vastness of this hangar.
 High-angle shot that allows capturing the vastness of this hangar.
Low-angle shot to highlight the subject.
 Low-angle shot to highlight the subject.
Changing perspective isn’t just about moving horizontally. Climb onto a chair, kneel, or even lie down to explore unexpected viewpoints.
3. Use Leading Lines to Structure the Image
Leading lines are visual elements that naturally guide the viewer’s eye through the image. This can be a road, a path, a river, or even architectural elements like stairs or buildings. By using these lines, you can direct the viewer’s eye toward the main subject of the photo.
Examples of leading lines to use:
- Roads, paths, and rails for landscape photos.
- Tree branches or natural shadows for nature scenes.
- Hallways and walls for urban portraits.

4. Master Negative Space
Negative space, or the empty areas surrounding your subject, plays a crucial role in photographic composition. When used well, it creates visual balance and highlights your main subject by removing unnecessary distractions. The idea is to let your image “breathe”: well-managed space naturally guides the viewer’s eye and conveys a sense of elegance and simplicity.
For example, in a portrait, a clean background will draw more attention to the model, while in minimalist photography, negative space enhances visual impact by isolating an object within a simple frame. This technique is also ideal for conveying a sense of calm or emotional intensity, depending on the context.
 The negative space is all the area in red.
Tip: if you’re unsure, take a version with more space around your subject. You can always crop later to achieve the desired effect.
5. Adjust Framing According to Orientation and Movement
Portrait (vertical) and landscape (horizontal) framing have no absolute rules. Use them based on what you want to express in your image. A vertical orientation can work for landscape scenes if you want to emphasize the height or elegance of an element like a tree or building, while horizontal framing is often better suited to capturing the width and depth of a scene.
In addition to orientation, leave space in front of your moving subjects to convey a sense of dynamism. If you’re photographing a car, for example, make sure there’s more space in front than behind it to suggest movement.
6. Play with Symmetry and Asymmetry
Symmetry is a powerful tool for creating visually harmonious images. It works particularly well in architectural photography, where straight lines and perfect reflections emphasize order and regularity. A symmetrical composition can evoke a sense of calm, stability, and perfection.
Asymmetry, on the other hand, brings a different dynamic, often more intriguing. By deliberately breaking visual balance, you introduce tension that draws the eye and makes the image memorable. Asymmetry is ideal for capturing natural scenes or more artistic compositions, where an unexpected arrangement of elements adds emotional depth.
To enrich your framing, alternate between these two approaches. Look for perfect symmetry in a bridge or building, then experiment with an asymmetrical composition to tell a different story. Playing with these contrasts can transform your images into captivating works.
7. Don’t Neglect Light
Framing can be perfect, but without proper light management, the visual impact can suffer. In corporate photography, light plays a crucial role in highlighting your subjects and the atmosphere you want to convey.
Outdoors, natural light, especially at sunrise or sunset, can add a warm touch to professional portraits. For example, for a shoot featuring employees outside, soft natural lighting can make portraits feel more authentic and engaging.
Indoors, light coming from a window creates an elegant ambiance for team or executive portraits. It adds a subtle dimension, illuminating the face while enhancing depth in the workspace.
During indoor events or professional reports, directed lighting on the speakers highlights the main subjects while maintaining a professional atmosphere. Softer lighting can be used for background scenes or event moments, creating dynamic contrast without distracting attention.
By adjusting the direction and intensity of light, you not only create sharper images but also an atmosphere that reinforces the message of your photo, whether it’s an executive portrait, a professional report, or event coverage.
Conclusion
At Rétines, we believe that mastering framing is the key to transforming ordinary photos into images that leave a lasting impression. Whether you apply the rule of thirds, play with perspectives, or use negative space, these techniques will help improve your compositions. If you want to take it further, don’t hesitate to call on our expertise to turn your ideas into visual reality. Contact us today to book a photo session and perfect your framing.
Jérémy Carlo is the editorial director at Rétines, where he ensures the consistency and clarity of all content produced by the studio.
Our Clients


Let’s discuss
What we do for you at Rétines
Meticulous work, an organised project and fast delivery. And to achieve this, we mobilise the right resources in our teams at the right time.
01
Pre-production
Artistic and technical direction tailored to the project.
Relevant recommendations on content, form and resources.
02
Photo Shooting
Photos taken by our experienced photographers.
Production that’s controlled, efficient and tailored to the needs of the project, with nothing superfluous.
03
Retouching
Technique
Photographs magnified by our retouching team.
Post-production to meet the commercial challenges of the brief.